I love working with salt dough. You can do so much with it, the possibilities are endless. It's easy and inexpensive to make. You probably have the ingredients sitting in your cupboards right now. I like putting food coloring right in the dough. Once baked, the colors come out bright and beautiful. You can also paint it, cover it in glitter, or just leave it as is. This is the kind of baking I excel at. The finished product is supposed to be hard as a rock and tasteless! Here is the recipe I use, although if you search google you'll find a bunch of different variations.
Ingredients
2 cups white flour
1 cup table salt
1 cup water
1 tbsp vegetable oil
Mix all ingredients in a large bowl until they form a smooth dough. You can try to mix it with a spoon, but it wont's work. Get your hands in there and get dirty! If the dough seems too runny, gradually add a little more flour. If it's too flaky, gradually add some water. Once you get the dough to a workable consistency, you can either kneed in food coloring or leave it as it. Now you are ready to let your imagination go wild! Sprinkle some flour on your work surface and your cookie sheets to prevent sticking. If you plan to make ornaments, remember to punch a hole in the top with a straw! You can either let them air dry (takes wayyy too long for me) or bake them at 200 degrees until hard. After they are hard, you can paint them, cover them in glitter, or even write on them with sharpies. I like to paint on a coat of Elmer's glue to give them a nice inexpensive shine.


These are some salt dough valentines we made by adding food coloring right to the dough. We used cookie cutters to make the hearts, and sculpted the eyes and mouths by hand. We attached ribbons and wrote a message on the back with a sharpie.

Little hands hard at work!

A glitter covered ornament on the tree.

Ready to go in the oven. (These make great Christmas presents from the kids!)


 A while ago we made these tissue paper bowls, but I'm just getting around to posting them now. To make one, you will first need to cut up a bunch of tissue paper squares. Next you spray a bowl with cooking spray then cover it with plastic wrap. Finally, you'll need a mixture of 1/4 cup flour and 1/2 cup of water. Then comes the fun part! Set your child loose with the flour and water mixture. They will need to paint the outside of the bowl and stick tissue paper squares to it. They will continue to paint and stick until they have at least 5 layers. I recommend painting a good coat of the flour water mixture over the entire thing when they are done, before leaving it out to air dry. Ours took three days to dry, but it was worth the wait! Ours were made with Valentine's themed tissue paper, but you can use whatever you have on hand. We are already planning on making some and filling them with candy for Christmas gifts!
 I recently started cutting up paper grocery bags and letting the kids finger paint on them.

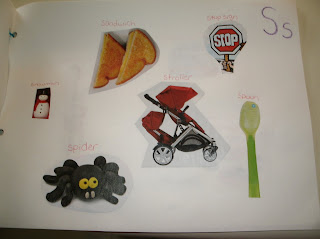
 We've been working on this alphabet book to reinforce the letter sounds with my favorite three year old. It's coming along nicely, except for the X and Z pages which are still blank. The pictures so far have been cut out of old magazines, but I think I may just have to print out a zebra and a xylophone.
 This is a piggy that my three year old made out of two formula lids. We have an overabundance of formula containers from her little brother, but I won't give them away to the recycling truck because they are so handy for crafts. We rummaged through the craft supplies and found a pink button for the nose, pipe cleaners for the legs, tail, and ears, and some funky red googly eyes.


 First I taped six pieces of paper together to make one large piece. (I didn't have any poster board, and sure as heck wasn't making a trip out with the poop troop for one thing.) Next I glued down the numbers 0-10 and drew the lines. Now it was time for my favorite three year old to glue on the beads. As you can see, she glued one bead next to the 1, two beads next to the 2, and so forth. I should also mention that she did this with no help, and got it perfect! She was very proud of her work and hung the finished product in her room.

 This is a cute little hand print fish we made a while ago. The fish bowl is just a paper plate cut in half. The fish is a hand print with a google eye. Notice the HUGE google eye. Thanks mom!


 Here comes the contact paper
 All done


